FUSION3 TIPS & TRICKS: EXPORTING STL FILES FOR BEST 3D PRINTING QUALITY
UNDERSTANDING THE STL FORMAT
A traditional CAD (computer aided design file) uses a series of coordinates and formulas to represent the shape of your 3D object.
However, the .STL format is a bit different. It uses a series of triangles to generate a ‘mesh’ of the surface of your 3D part.
.STL can perfectly replicate a 3D model made up of flat surfaces.
If your model is made up of curves, the .STL file is only making an approximation of your object. This is why the quality of the amount of detail in your exported file is important for the quality of your 3D print.
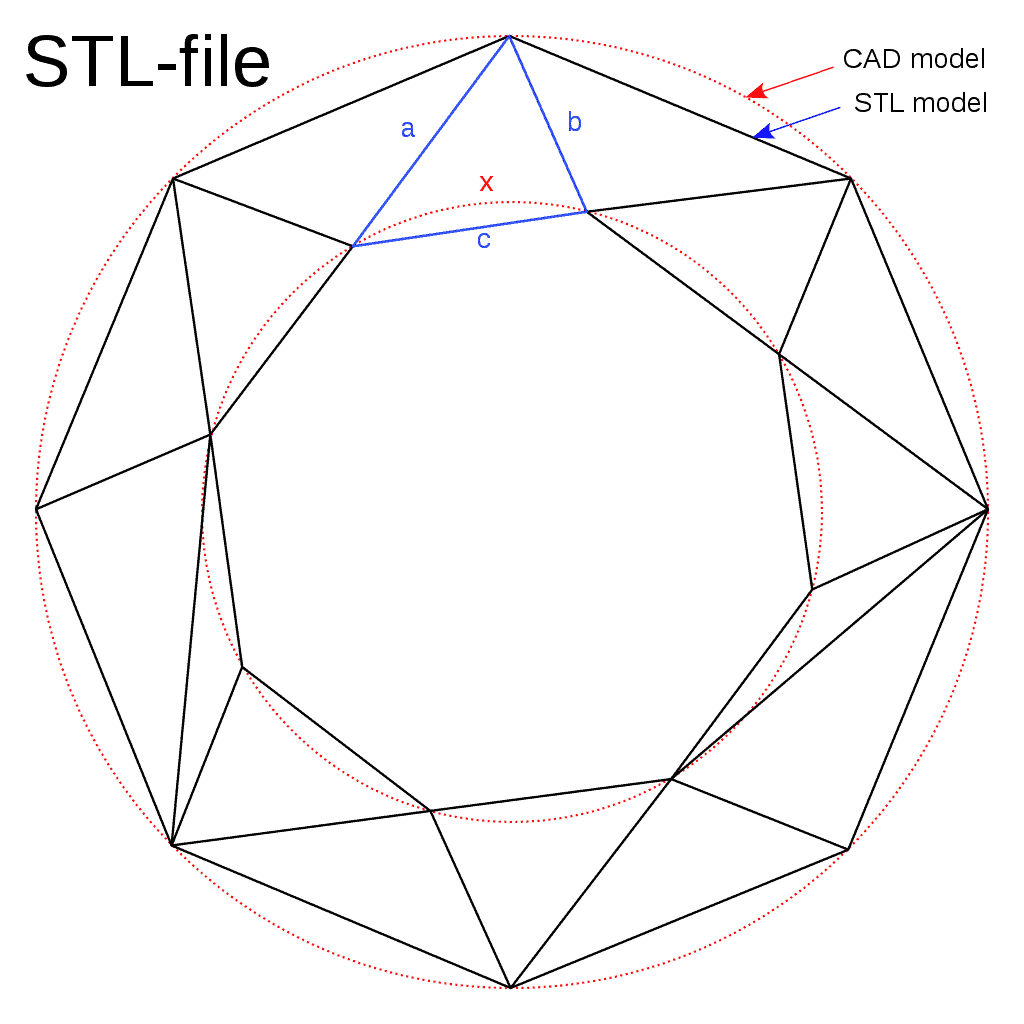
Two concentric circles, representing a CAD model of a doughnut shape, and a series of triangles approximating the doughnut, representing how STL modeling works. (Source: Wikipedia)
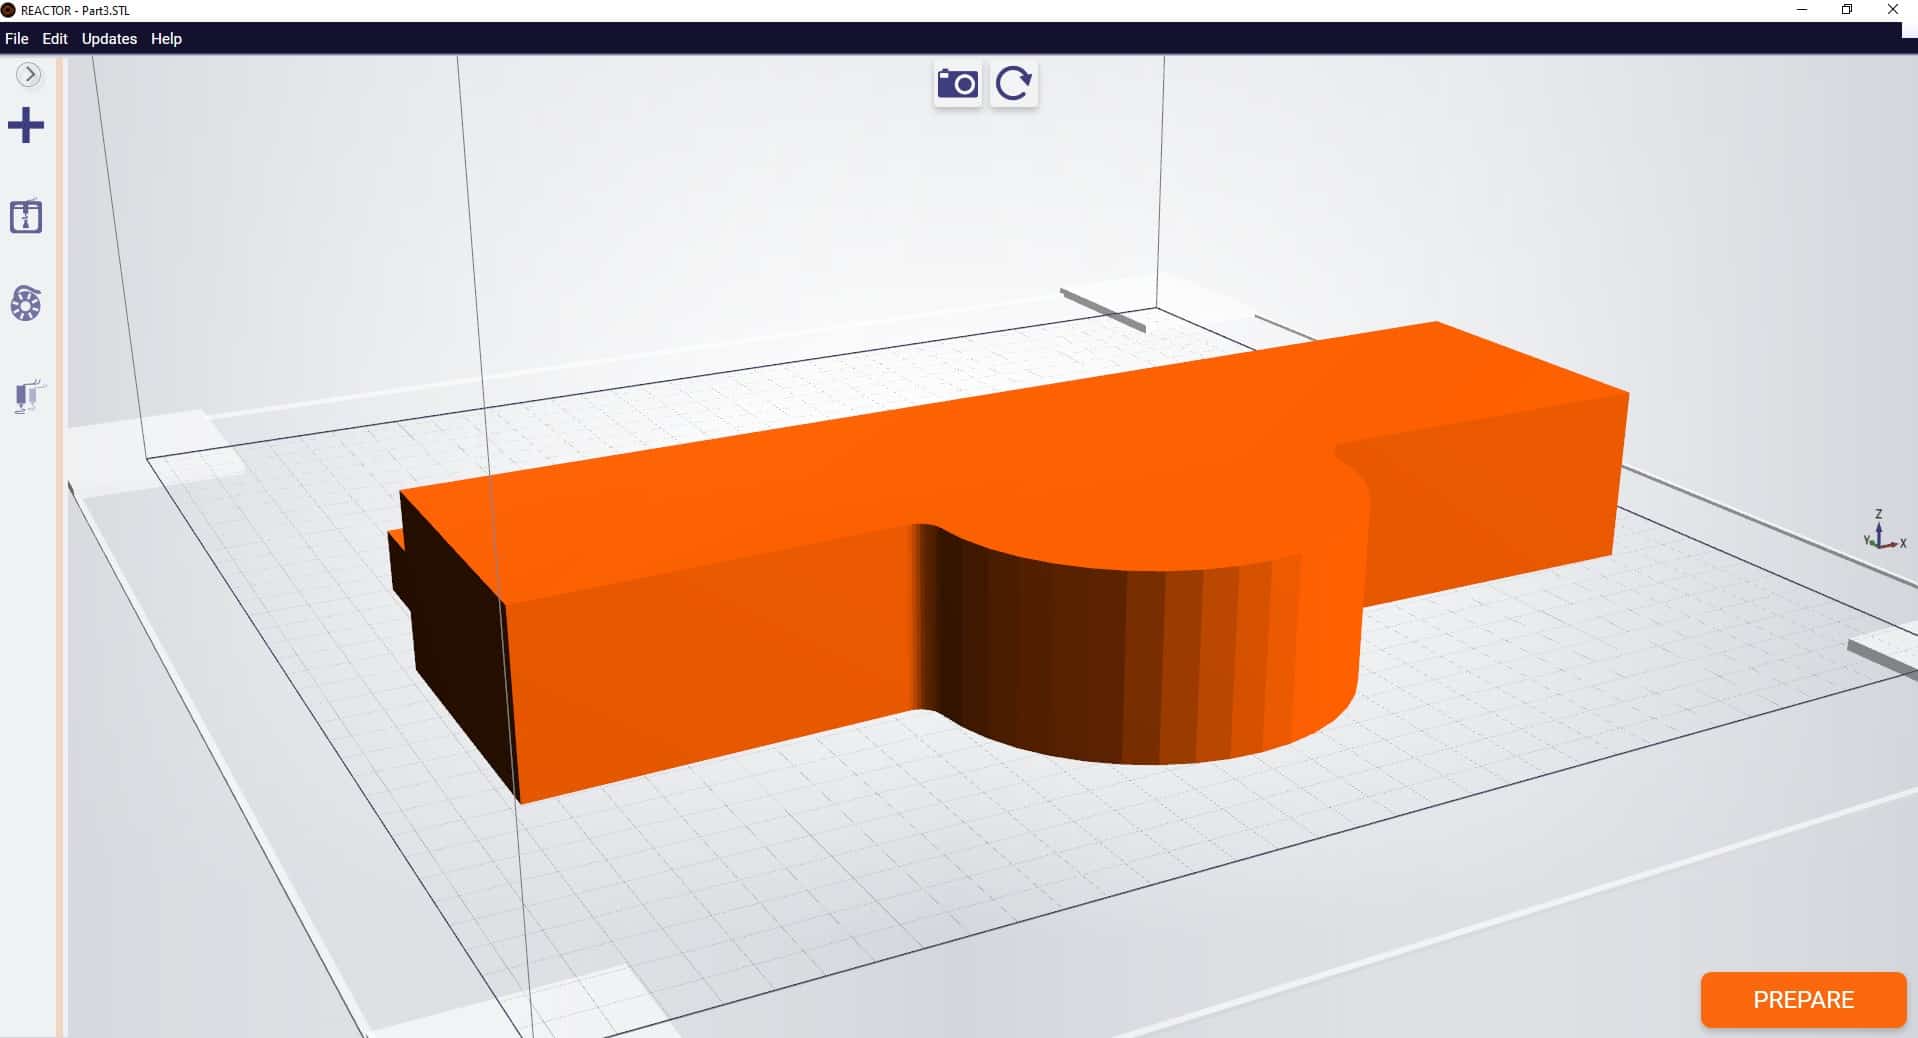
STL file in Fusion3 REACTOR showing too few curves when exported. Note how the rounded surface shows as a series of rectangular bevels.
EXPORTING YOUR CAD FILE WITH TOO FEW POLYGONS
If you export the file with too few polygons, the model will have visible flaws on its surface when printed.
This will most likely appear either as triangles on a rounded surface or rectangular bevels on a curved
EXPORTING YOUR CAD FILE WITH TOO MANY POLYGONS
The reaction by most people is to export the file with as many polygons as possible. This is also not recommended.
The FDM 3D printing process likely cannot recreate this level of detail. The larger file size and details may cause the slicer software to either:
- Work much more slowly or freeze
- Cause errors for either the printer or software as it attempts to handle levels of detail beyond its capability.
EXPORTING YOUR CAD FILE WITH THE RIGHT AMOUNT OF POLYGONS
As with Goldilocks and the three bears, there is a “just right” level of detail for 3D printing.
This amount of detail provides an amount of polygons sufficient for a 3D printer of the F410’s caliber to be able to create the part in high detail, but not overwhelm the printer’s software.
As shown in the image on the right, rounded shapes appear smooth with a minimum of faceting.
In each of the sections below, we at Fusion3 provide you with a compilation of optimized settings for exporting .STL files with each of the major CAD programs.
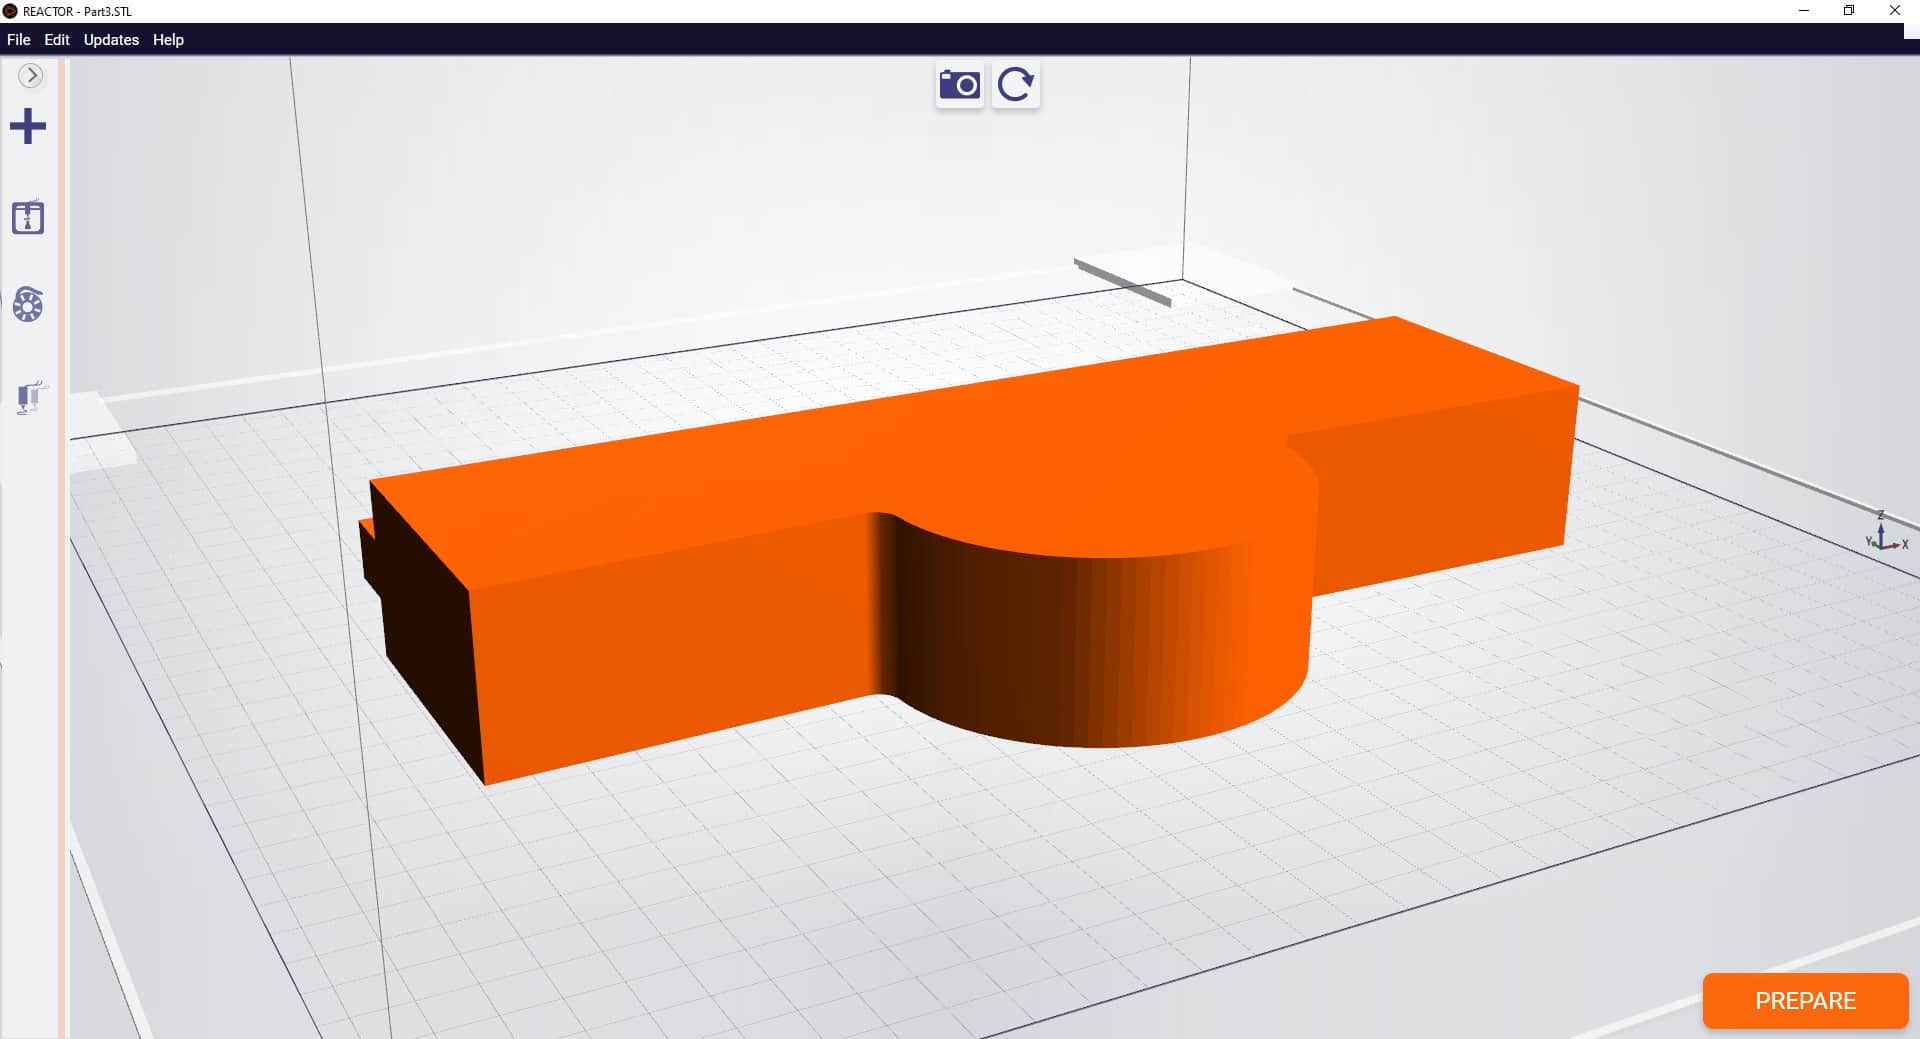
.STL file in Fusion3 REACTOR showing sufficient number of polygons to render the curve without overwhelming the software. The rounded surface now appears smooth.
EXPORTING STL FILES FROM SOLIDWORKS FOR BEST 3D PRINTING QUALITY
Most Fusion3 customers use SolidWorks. In the past, SolidWorks’ STL export filter using the “FINE” preset would generate excellent output. However, recently (as of January, 2021), we have found the level of detail to still be inadequate and below the level of detail our 3D printers are capable of.
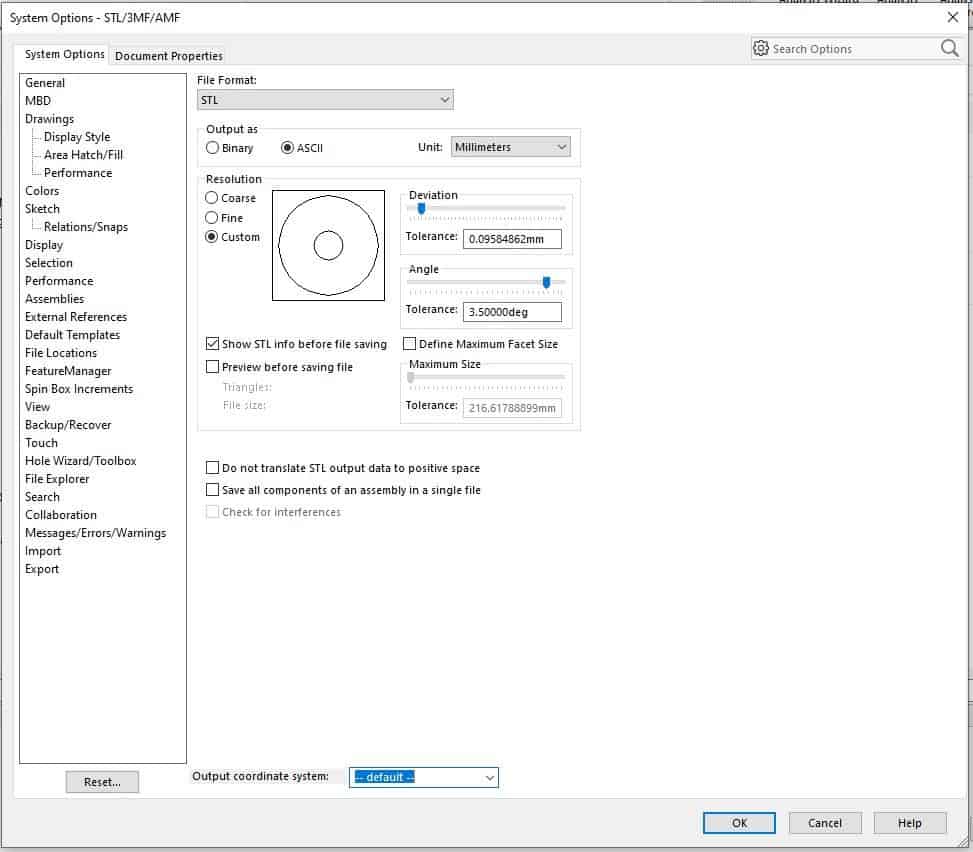
Here are our recommended settings for exporting an STL file from SolidWorks for 3D printing on a Fusion3 3D printer (and accompanying screen shot):
File Format: STL
Output as:
a. ASCII
b. Unit: Millimeters
Resolution:
a. Custom
b. Deviation: Tolerance 0.09584862mm
c. Angle 3.500 deg
d. Show STL info before saving
e. Define Maximum Facet Size (unchecked)
f. Preview Before Saviing File (unchecked)
Do no translate STL output data to positive space: (unchecked)
Save all components of an assembly in a single file: (unchecked)
.STL file in Fusion3 REACTOR showing sufficient number of polygons to render the curve without overwhelming the software. The rounded surface now appears smooth.
EXPORTING STL FILES FROM AUTODESK INVENTOR FOR BEST 3D PRINTING QUALITY
- Before finalizing your export, select the Options tab.
- Select “High” resolution (faceting) for your model (High, Medium, Low and Custom) and check that your units are correct. The “High” setting will produce a large file size. Autodesk Inventor allows you to save both individual parts and assemblies in STL format, at all design levels.
- Check your modifiers have been applied before exporting:
Tools > Rebuild All (this ensures that the design data contains recent changes, and that it is not corrupt)
File > Save Copy As > STL (.stl)
Select High and click OKNote: To change the values associated with each of the resolution settings (High/Medium/Low) you need to edit the Windows registry.
Select IPro > Print > 3D Print Preview - Select Options and choose desired resolution and click OK.
- Within the preview window, select Save Copy As or Send to 3D Print Service
- Save As type to STL File (*.stl)
EXPORTING STL FILES FROM AUTODESK FUSION360 FOR BEST 3D PRINTING QUALITY
Step 1.
Right click on a body in the workspace browser.
Select the “Save As STL” Command.
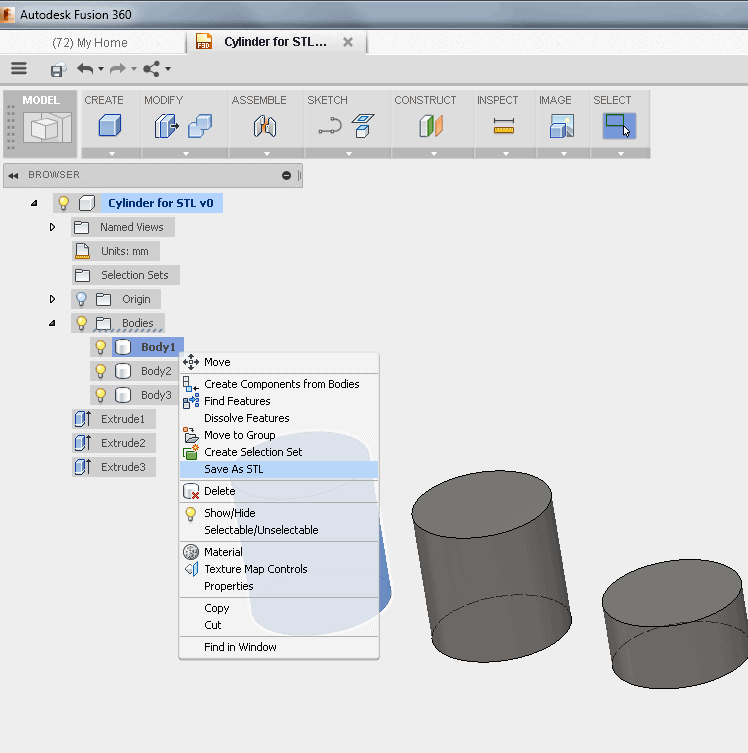
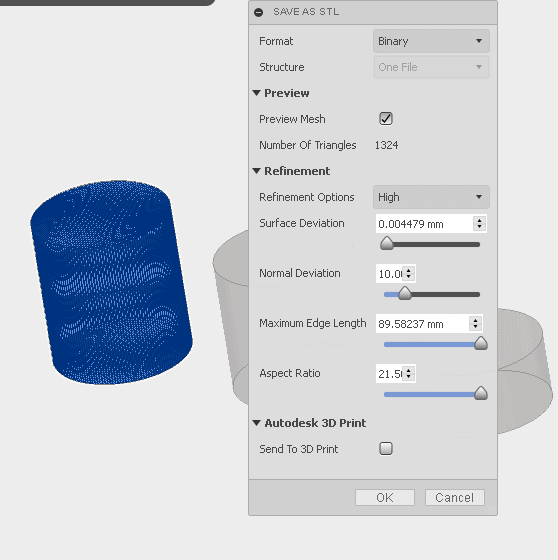
Step 2.
Format: Binary
Structure: One File
Preview Mesh: Checked
Number of Triangles: (Calculated)
Refinement Options: High
Surface Deviation: .004479mm
Normal Deviation: 10.00
Maximum Edge Length: 89.58237mm
Aspect Ratio: 21.50
EXPORTING STL FILES FROM ONSHAPE (PTC) FOR BEST 3D PRINTING QUALITY
STL Format: Binary
Angular Deviation: 1 Degree
Chordal Tolerance: 0.1mm (0.004″)
Minimum Facet Width: 0.1mm (0.004″)
EXPORTING STL FILES FROM NX (SIEMENS) FOR BEST 3D PRINTING QUALITY
Output File Type: Binary
Chordal Tolerance: 0.1mm (0.004″)
Angular Tolerance: 1 degree
EXPORTING STL FILES FROM CREO (PTC) FOR BEST 3D PRINTING QUALITY
Creo has a parameter called ‘Angle Control’ that doe not adjust the maximum angular deviation in degrees. Instead, this is a measure of angular deviation beyond the radius that would be created by the ‘Chord height’ (chordal tolerance) parameter.
The ‘Angle control’ parameter value can range from 0.0 to 1.0.
Here are a set of settings we suggest as a starting point:
STL Format: Binary
Chord height: 0.1 mm (0.004″)
Angle Control: 0.25
Maximum Edge Length: Default
Aspect Ratio: Default